How TSPL command works
Label printers can support programming languages like TSPL, ZPL, EPL, and so on.
Here we are going to overview the TSPL language. We can build labels using TSPL commands like
TEXT, BARCODE and QRCODE.For instance, if we want to print a label with a text and barcode, we use these commands with their properties like position or size, and send these commands to the label printer over Bluetooth, USB, LAN or Serial connection
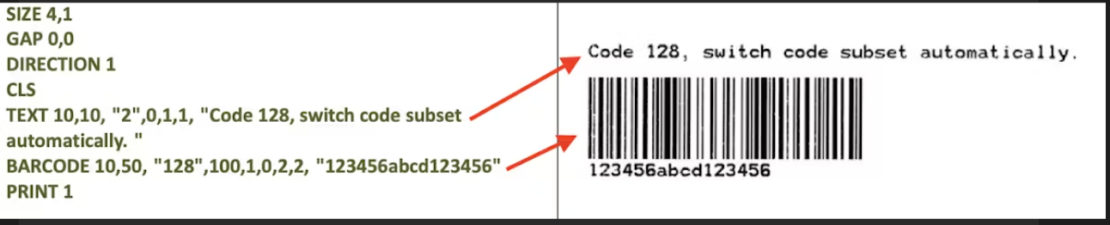
On the left side, you can see the TSPL commands and the printed label on the right side.
You can find all the available commands here, but let’s look at some of them to understand how to use the TSPL.
Coordinates and size in dots
Whether it is a
TEXT, BARCODE or BITMAP, generally, the coordinates and size are in dots. The number of dots per inch depends on the printer's DPI.For instance, if the printer is
- 203 DPI → means there are 203 dots in one inch, or there are 8 dots in 1 mm.
- 300 DPI → means there are 300 dots in one inch, or there are 11.8 dots in 1 mm.
According to this, if we want to add a barcode with a height of 10mm, and the printer is 203DPI, then we should set the height as 80 (10mm x 8 = 80 dots).
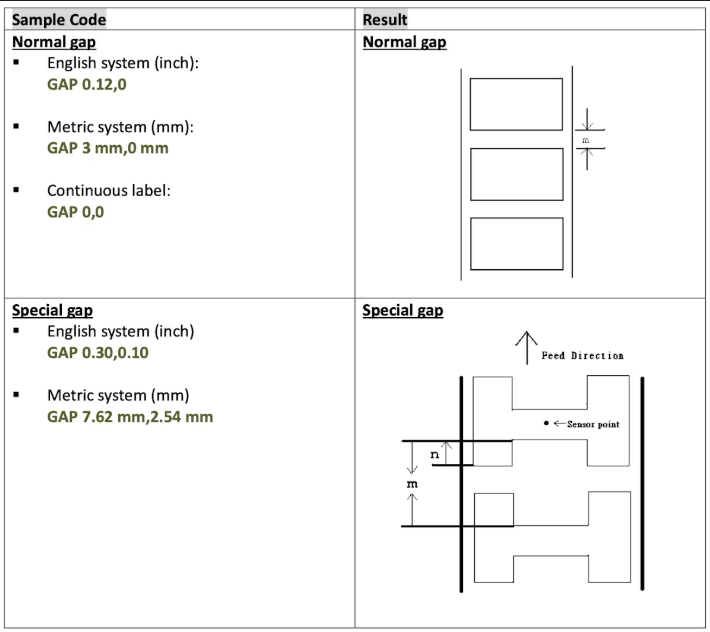
Size and gap of the label
We need to tell the printer the size of the label like this:
SIZE 4,1Here we said that size of the label is 4x1 inches.SIZE 50 mm,25 mmWe can also set it in a metric system (mm):GAP 0,0We can set the gap which is the space between labels (GAP m,n).Here the gap is zero inches which means it is a continuous label.
Text
We can use
TEXT command to print a text on the label. We can give the position, font size, rotation, and so on:TEXT x,y,“font”,rotation,x-multiplication,y-multiplication,[alignment,] “content”
Parameter | Description |
x, y | x and y-coordinate |
font | Generally, we can set 1-8 (1-small, 2-bigger… 8-biggest) |
rotation | 0, 90, 180, 270 in clockwise direction |
x and y-multiplication | Scale factor 1-10 |
alignment | 1-left, 2-center, 3-right (optional) |
content | Text content |
SAMPLE COMMANDS | RESULT |
SIZE 4,3 GAP 0,0 DIRECTION 1 CLS TEXT 10,10,"0",0,12,12,"TSPL 2" TEXT 10,40,"0",0,8,8,"align left" BAR 0,70,800,4 TEXT 10,110,"0",0,12,12,"FONT 0" TEXT 10,160,"1",0,1,1,"FONT 1" TEXT 10,210,"2",0,1,1,"FONT 2" TEXT 10,260,"3",0,1,1,0,"FONT 3" TEXT 10,310,"4",0,1,1,0,"FONT 4" TEXT 10,360,"5",0,1,1,0,"FONT 5" TEXT 10,410,"6",0,1,1,1,"FONT 6" TEXT 10,460,"7",0,1,1,1,"FONT 7" TEXT 10,510,"8",0,1,1,1,"FONT 8" TEXT 10,560,"ROMAN.TTF",0,12,12,"FONT ROMAN.TTF" TEXT 400,10,"0",0,12,12,2,"EPL 2" TEXT 400,40,"0",0,8,8,2,"align center" TEXT 400,110,"1.EFT",0,1,1,2,"FONT 1" TEXT 400,160,"2.EFT",0,1,1,2,"FONT 2" TEXT 400,210,"3.EFT",0,1,1,2,"FONT 3" TEXT 400,260,"4.EFT",0,1,1,2,"FONT 4" TEXT 400,310,"5.EFT",0,1,1,2,"FONT 5" TEXT 800,10,"0",0,12,12,3,"ZPL 2" TEXT 800,40,"0",0,8,8,3,"align right" TEXT 800,110,"A.FNT",0,1,1,3,"FONT A" TEXT 800,160,"B.FNT",0,1,1,3,"FONT B" TEXT 800,210,"D.FNT",0,1,1,3,"FONT D" TEXT 800,260,"E8.FNT",0,1,1,3,"FONT E8" TEXT 800,310,"F.FNT",0,1,1,3,"FONT F" TEXT 800,360,"G.FNT",0,1,1,3,"FONT G" TEXT 800,410,"H8.FNT",0,1,1,3,"FONT H8" TEXT 800,460,"GS.FNT",0,1,1,3,"ABCDEF" PRINT 1 | 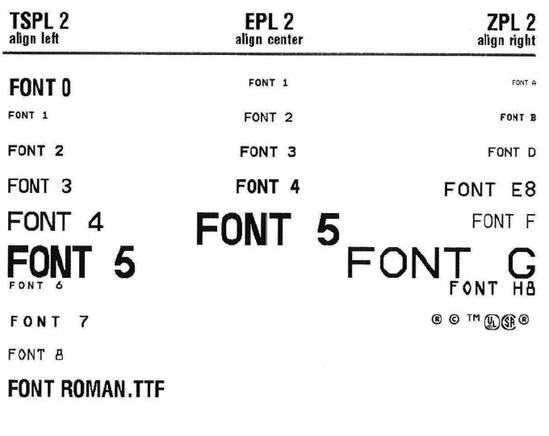 |
Barcode
We can add a barcode to the label with the
BARCODE command:BARCODE X,Y,”code type”,height,human-readable,rotation,narrow,wide,[alignment,]”content”
Parameter | Description |
x, y | x and y-coordinate |
code type | 128, EAN128, EAN13… |
height | Height in dots |
human-readable | 0 - barcode value (text) is not visible 1 - text is left-aligned 2 - center-aligned 3 - right-aligned |
rotation | 0, 90, 180, 270 in clockwise direction |
narrow | Width of the narrow element in dots |
wide | Width of the wide element in dots |
alignment | 1-left, 2-center, 3-right (optional) |
content | Content of barcode |
Sample commands | Result |
TEXT 10,10, "2",0,1,1, "Human readable alignment" BARCODE 10,50, "128",100,1,0,2,2,"left" BARCODE 310,50, "128",100,2,0,2,2,"center" BARCODE 610,50, "128",100,3,0,2,2,"right" | 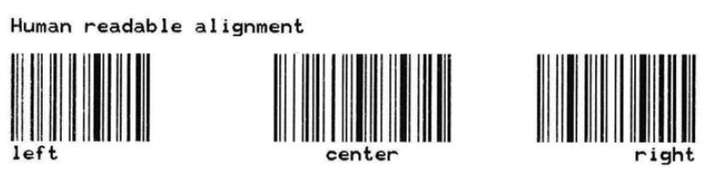 |
PRINT and END commands
After building the label we need to tell the printer that the label is ready to print.
We use PRINT m[,n] command to do this:
Commands | Description |
SIZE 50 mm,25 mm CLS TEXT 10,10, "2",0,1,1, "Text 1" PRINT 1 CLS TEXT 10,10, "2",0,1,1, "Text 2" PRINT 2 END | - Set the size of the label - Clear the buffer - Add text - Print the buffer once - Clear the buffer - Add text - Print the buffer two times - End of program |
It prints three labels; one label with “Text 1“ and two labels with “Text 2“.
We add END command at the end, to tell the printer that we’ve finished printing. Without this command, the printer may not print the last image in the buffer.